Roland S-330 Web Editor Guide
This guide covers all features of the S-330 web editor. For background on the S-330 sampler and why this editor exists, see our blog post about the S-330 web editor.
Quick Links
Getting Started
Requirements
- Roland S-330 sampler with MIDI connections
- MIDI interface connected to your computer (USB MIDI interface or built-in MIDI ports)
- Web browser with Web MIDI support: Chrome, Edge, or Opera (Firefox and Safari do not support Web MIDI)
- Optional: USB video capture device for displaying the S-330’s native screen
Connecting Your S-330
- Connect your MIDI interface to your computer
- Connect MIDI cables between your interface and the S-330:
- Interface MIDI OUT → S-330 MIDI IN
- S-330 MIDI OUT → Interface MIDI IN
- Power on the S-330
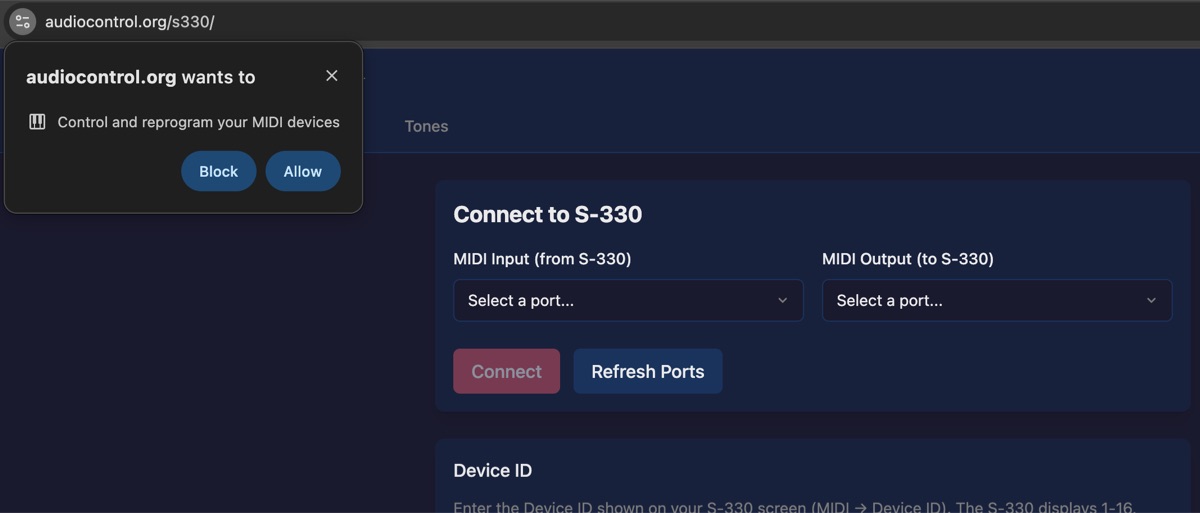
- Open the editor at audiocontrol.org/roland/s330/editor
- Your browser may prompt for MIDI access permission—allow it
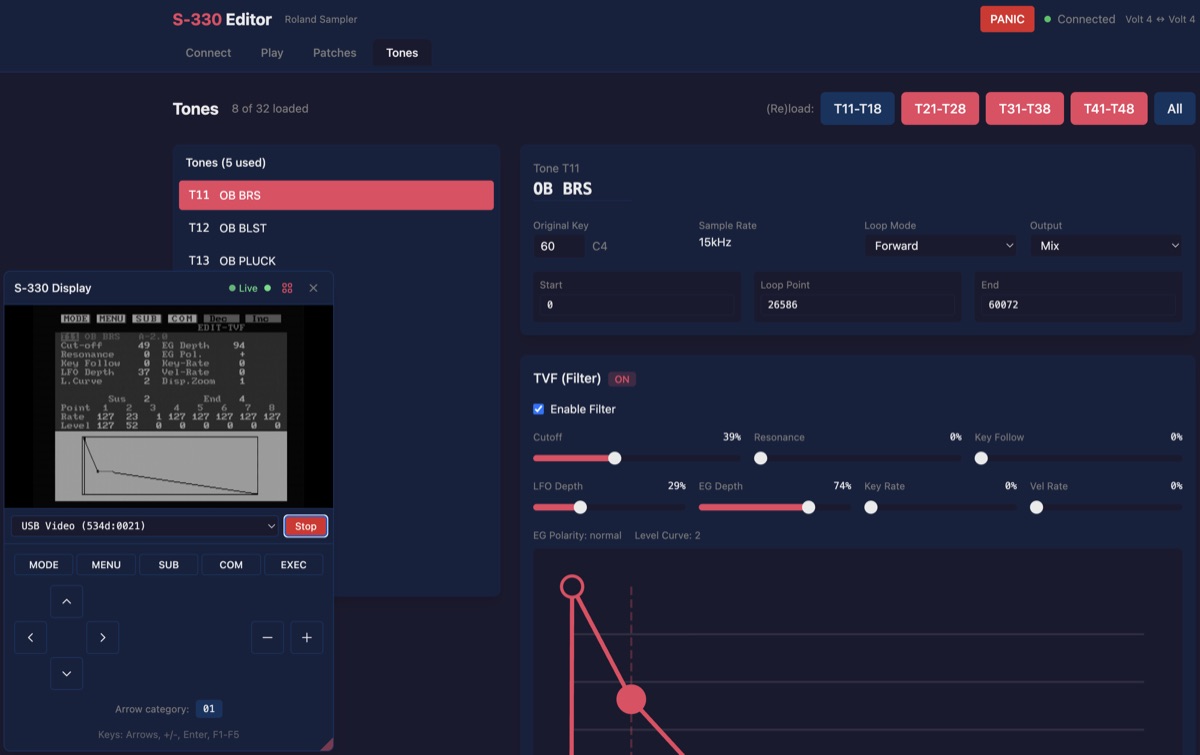
Using Video Capture as a Display
If you don’t have a monitor connected to your S-330, you can use the web editor’s video capture feature as a standalone display—even before enabling SysEx or connecting MIDI. This is a great way to see the S-330’s native screen while you configure the sampler.
S-330 Video Outputs
The S-330 has two video output connectors:
| Output | Signal Type | Notes |
|---|---|---|
| RGB (8-pin DIN) | TTL-level digital RGB at 15kHz | Non-standard signal; requires specialized converter for modern displays |
| Composite (RCA) | Standard composite video | Works with any composite capture device; displays in black and white |
For most users, the composite output is the practical choice. While it only displays in monochrome, it works with inexpensive USB capture devices and is perfectly readable for navigating the S-330’s menus.
Choosing a Capture Device
Any USB video capture device with a composite (RCA) input will work. Look for:
- Composite video input (yellow RCA jack)
- USB connection to your computer
- UVC (USB Video Class) support for plug-and-play compatibility with browsers
Inexpensive capture devices are perfectly adequate for this purpose—you’re displaying a 200-line monochrome screen, not capturing high-definition video. Even budget devices under $20 work well.
What you need:
- A USB composite video capture device
- An RCA cable from the S-330’s composite video output to the capture device
To use the video capture:
- Open the editor at audiocontrol.org/roland/s330/editor
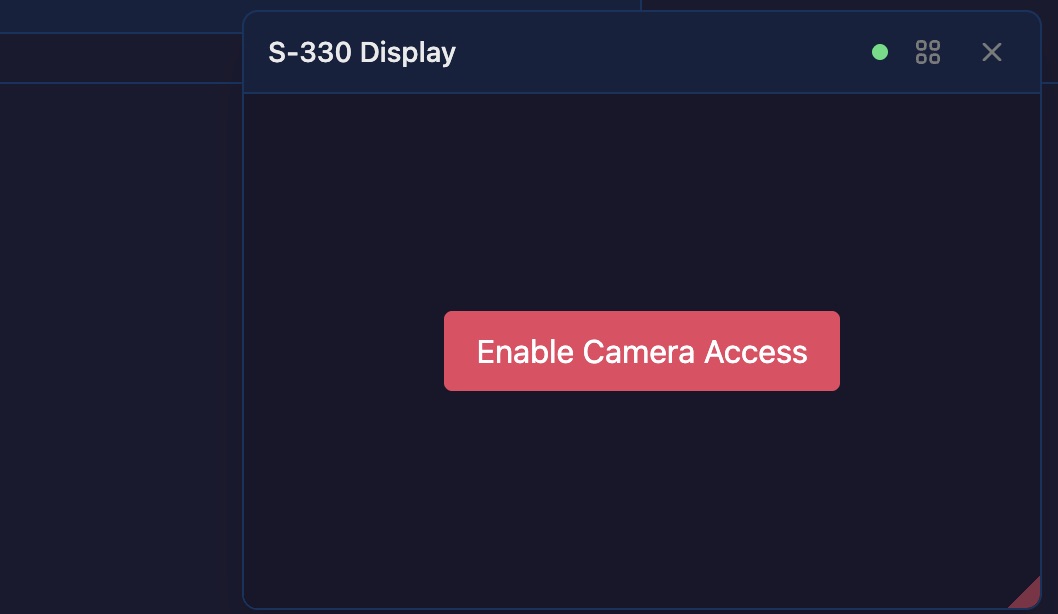
- Click the video toggle tab on the left edge of the screen to open the video drawer

- Click Enable Camera Access and grant permission when prompted
- Select your USB capture device from the dropdown
- Click Start
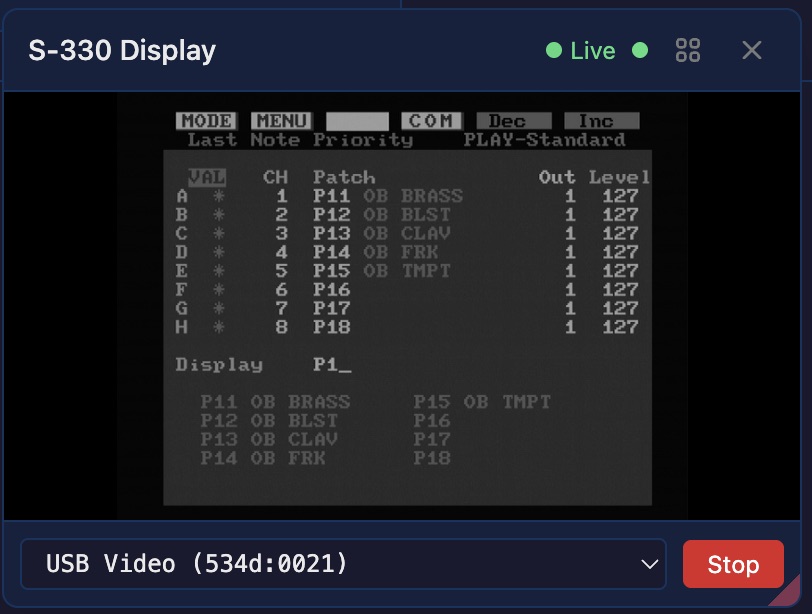
You’ll now see your S-330’s native display in the browser window. You can use this to navigate the sampler’s menus with the physical front panel buttons—for example, to enable System Exclusive as described in the next section.
Tip: Drag the right edge of the video drawer to resize it. The drawer remembers its width between sessions.
Enabling System Exclusive on the S-330
The editor communicates with the S-330 via MIDI System Exclusive (SysEx) messages. You must enable SysEx reception on the sampler:
- Press MODE to open the Mode menu
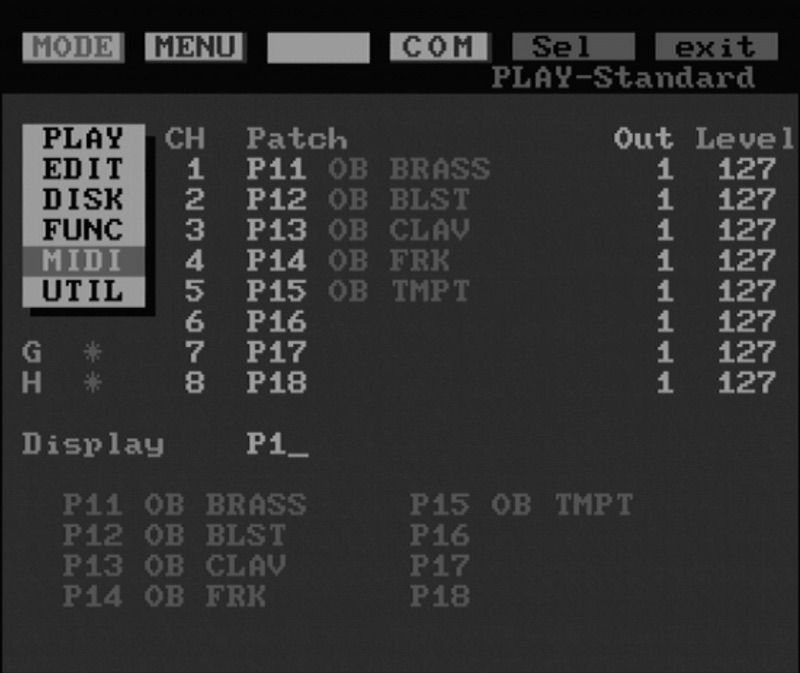
- Select MIDI from the menu
- Press MENU to see the MIDI options, then select Message
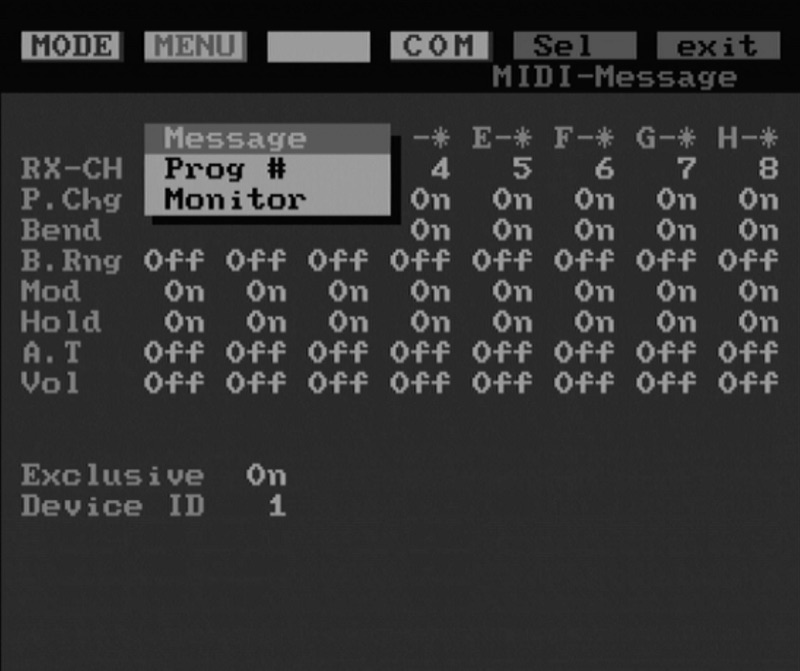
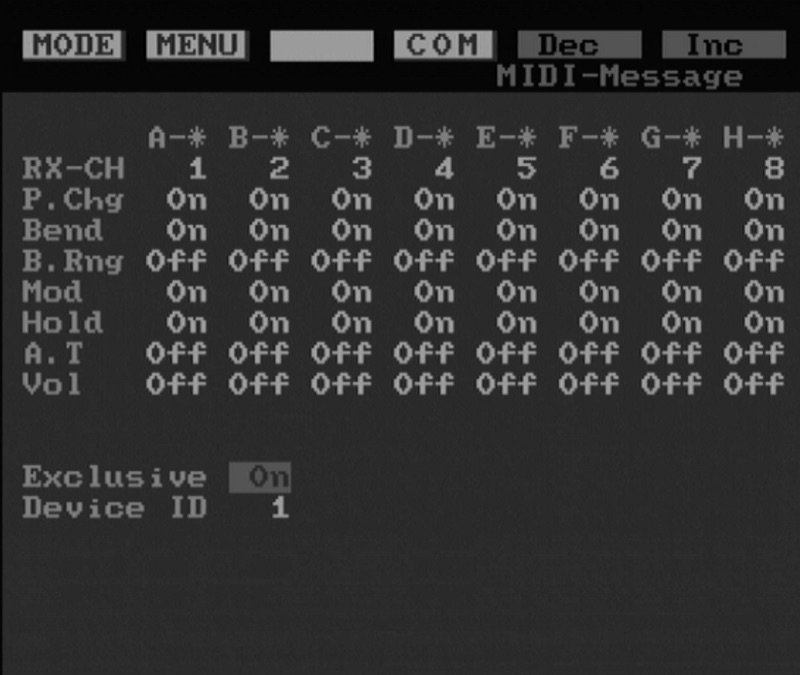
- Navigate to Exclusive and set it to On using INC/DEC
- Note the Device ID value—you’ll need to match this in the web editor (default is usually 1)
Selecting MIDI Ports
When the editor loads, you’ll see a MIDI port selector in the header:
- Click the Input dropdown and select your MIDI interface’s input port (receives data from S-330)
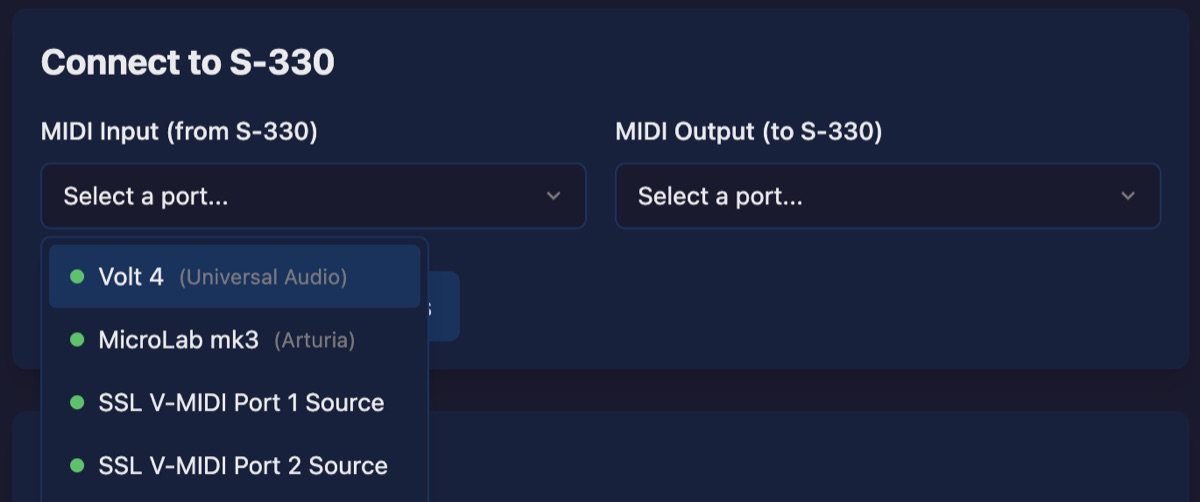
- Click the Output dropdown and select your MIDI interface’s output port (sends data to S-330)
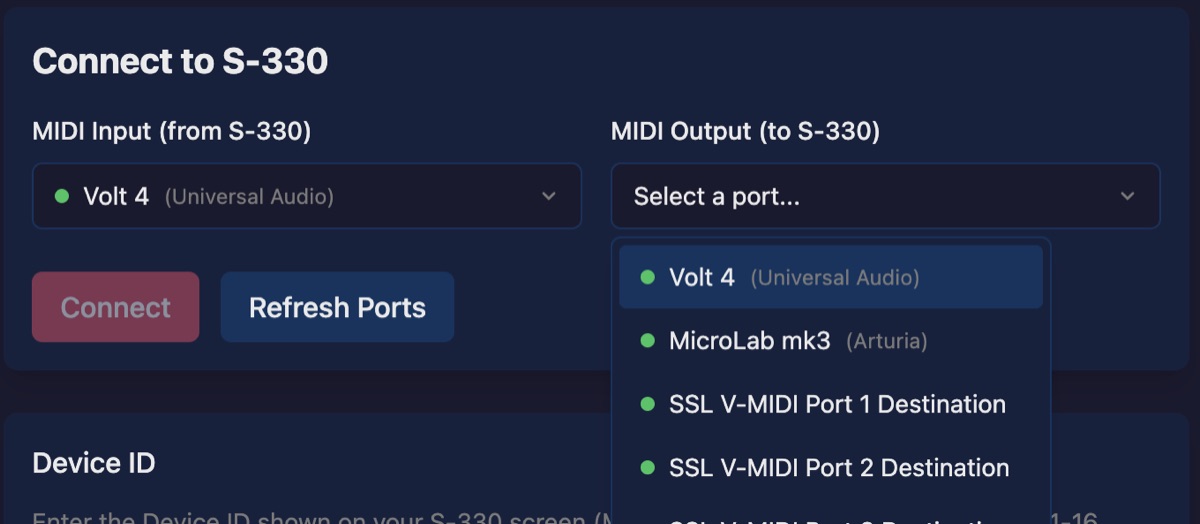
- Set the Device ID to match your S-330’s device ID (check the MIDI-Message screen on the sampler—often 1)
- Click Connect
The status indicator turns green when connected. The editor will automatically request the current patch and tone data from your S-330.
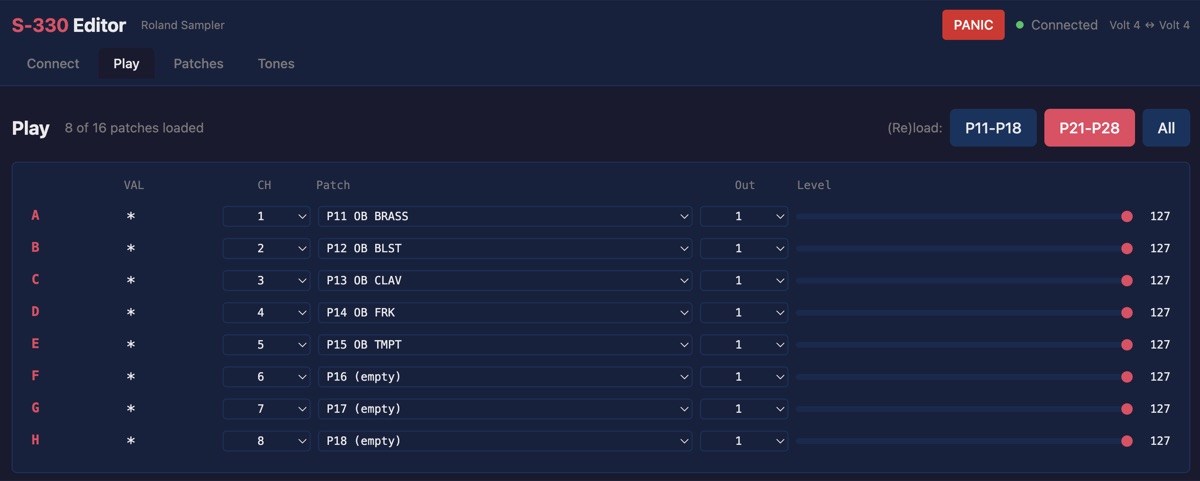
The Interface
The editor has four main sections, accessible via the navigation tabs:
- Connection — Overview and connection status
- Play — Performance mode settings
- Patches — Patch parameters and tone mapping
- Tones — Individual tone parameters (filter, envelopes, LFO, etc.)
Video Display Drawer
A slide-out drawer on the left side displays video from a USB capture device. This lets you see the S-330’s native screen alongside the web editor.
To set up video capture:
See Using Video Capture as a Display in the Getting Started section for step-by-step instructions with screenshots.
The drawer can be:
- Opened/closed by clicking the video toggle tab on the left edge
- Resized by dragging the right edge of the drawer
- The main content area shifts right when the drawer is open
Virtual Front Panel
The video panel includes virtual front panel controls that send button press commands to the S-330 via SysEx:
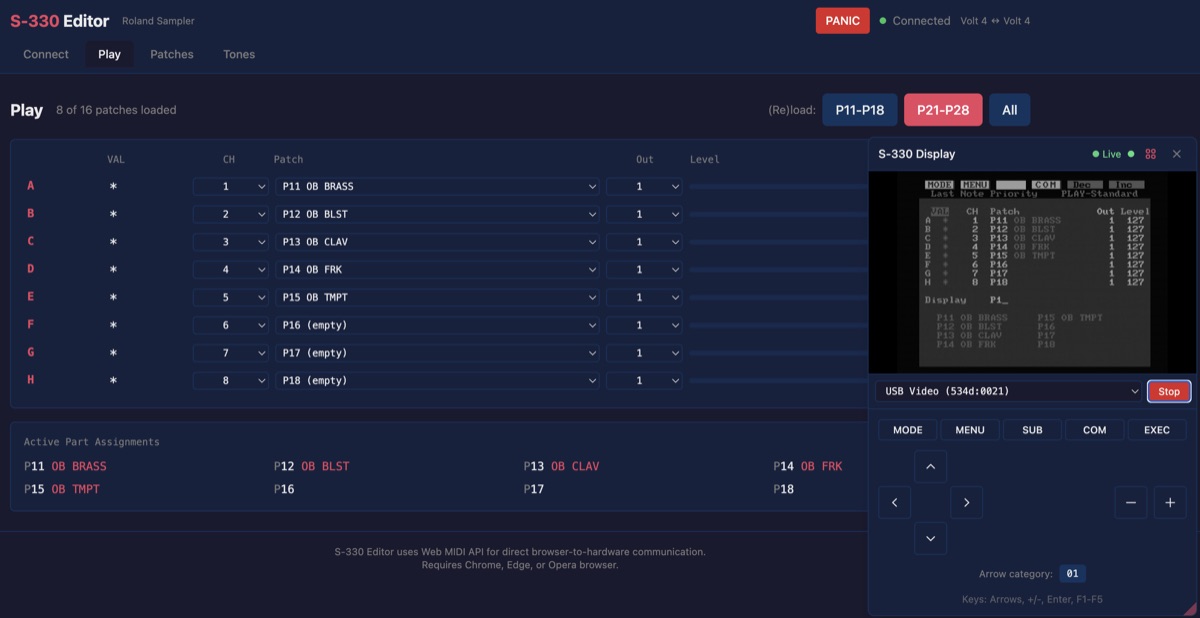
Function Buttons:
- MODE — Open the Mode menu
- MENU — Open the Menu
- SUB — Open the Sub Menu (e.g., Patch List, Tone List)
- COM — Open the Command window
- EXEC — Execute a command
Navigation:
- Arrow pad — Navigate menus and parameters (Up, Down, Left, Right)
- INC/DEC — Increment or decrement the selected value
Keyboard Shortcuts (when the video panel and controls are expanded):
- Arrow keys — Navigation
+or=— INC-or_— DECF1throughF5— Function buttons (MODE, MENU, SUB, COM, EXEC)Enter— EXECUTE
Navigation Mode Toggle: The “01” / “09” button switches between category 01 and category 09 SysEx codes. Category 01 works for most menu navigation. Category 09 was observed from hardware on the sampling screen but may not work reliably for remote control.
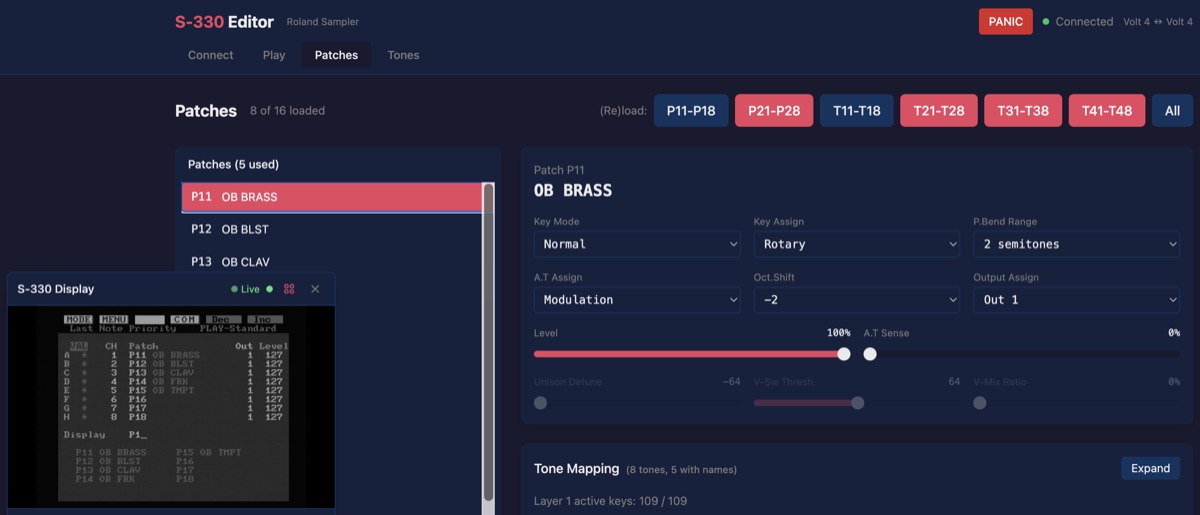
Patches
The S-330 organizes sounds into patches. Each patch contains:
- Common parameters (key mode, level, pitch bend range, etc.)
- Tone mapping for up to two layers across the keyboard
Patch List
The Patches page shows all 16 patches in two banks of 8: P11–P18 and P21–P28. Click a patch to select it for editing.
Loading Patch Banks:
The first bank (P11–P18) is automatically loaded when you connect. To load additional banks or refresh the data:
- Click the Load button next to a bank to request that bank’s data from the S-330
- Use this to sync the web editor if you’ve made changes on the sampler’s front panel
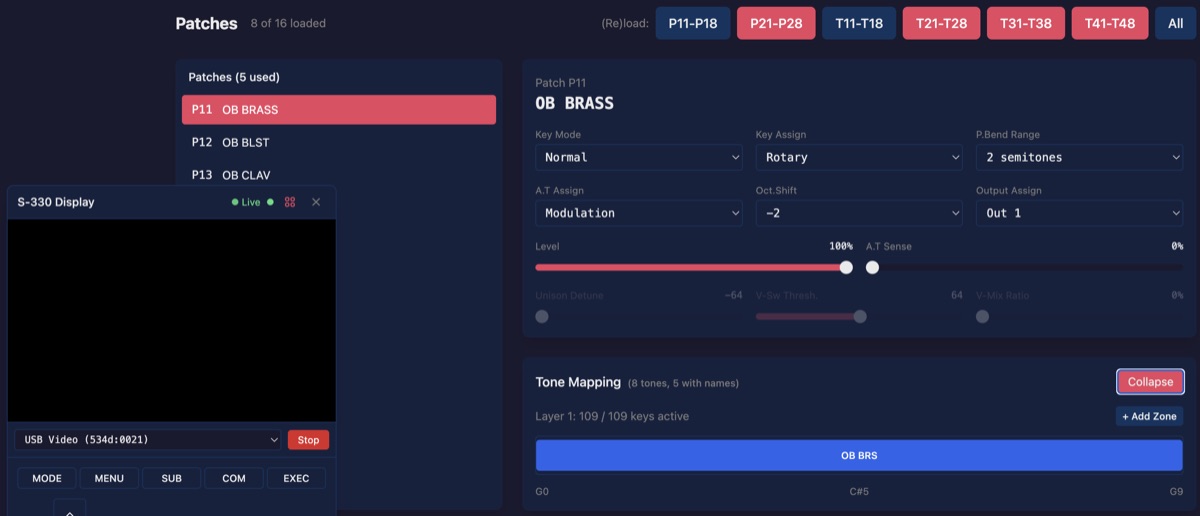
Patch Editor
The patch editor displays all parameters on a single page:
Header:
- Patch name — Click to edit (up to 12 characters)
Common Parameters:
| Parameter | Description |
|---|---|
| Key Mode | How the two tone layers interact: Normal, V-Sw (velocity switch), X-Fade, V-Mix, or Unison |
| Key Assign | Voice allocation: Rotary (round-robin) or Fix (same voice for same note) |
| P.Bend Range | Pitch bend range in semitones (0–12) |
| A.T Assign | Aftertouch destination: Modulation, Volume, Bend+, Bend-, or Filter |
| Oct.Shift | Octave transposition (-2 to +2) |
| Output Assign | Audio output routing (Out 1–8 or TONE for per-tone routing) |
| Level | Overall patch volume (0–127) |
| A.T Sense | Aftertouch sensitivity (0–127) |
Mode-Specific Parameters:
These activate depending on Key Mode:
- Unison Detune — Detune amount between unison voices
- V-Sw Thresh — Velocity threshold for switching between layers
- V-Mix Ratio — Balance between layers in V-Mix mode
Tone Zone Editor:
The zone editor displays keyboard-to-tone assignments as visual horizontal bars. Each zone represents a contiguous range of keys mapped to a single tone.
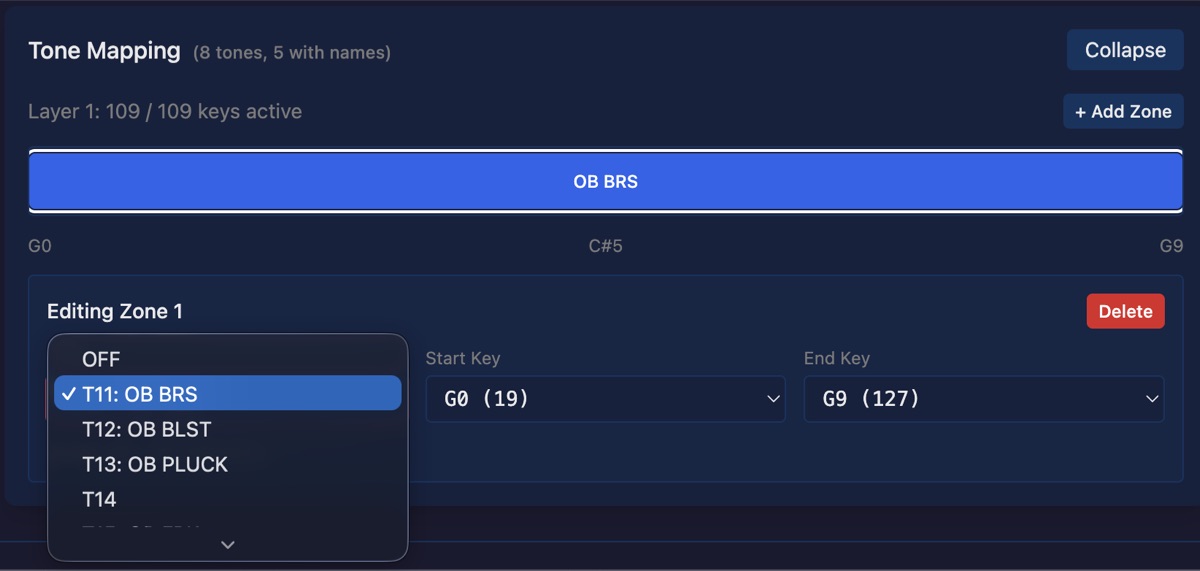
To edit zones:
- Click a zone bar to select it for editing
- Use the dropdowns to change the tone assignment, start key, or end key
- Click Learn next to a key field, then play a note on your MIDI controller to set that key
- Click Apply to confirm changes or Cancel to discard them
- Click + Add Zone to create a new zone in an unassigned range
- Click Delete to remove the selected zone
Tones
Each tone contains the actual sound parameters—the sample data references and all the controls that shape the sound.
Tone List
The Tones page shows all 32 tones in four banks of 8: T11–T18, T21–T28, T31–T38, and T41–T48. Tones are either:
- Original — Contains actual wave data
- Sub — References another tone’s wave data but has independent parameters
Click a tone to select it for editing.
Loading Tone Banks:
The first bank (T11–T18) is automatically loaded when you connect. To load additional banks or refresh the data:
- Click the Load button next to a bank to request that bank’s data from the S-330
- Use this to sync the web editor if you’ve made changes on the sampler’s front panel
Tone Editor
The tone editor presents all parameters organized into logical groups:
Basic Info
| Parameter | Description |
|---|---|
| Tone name | Up to 8 characters |
| Original Key | The MIDI note where the sample plays at original pitch |
| Sample Rate | Display only (15kHz, 30kHz, etc.) |
| Loop Mode | Forward, Alternate, One-Shot, or Reverse |
| Output | Individual output assignment (Mix or Out 1–8) |
Wave Points
These control which portion of the sample memory is used:
| Parameter | Description |
|---|---|
| Start | Sample start point |
| Loop Point | Where the loop begins |
| End | Sample end point |
TVF (Filter)
The S-330’s resonant low-pass filter:
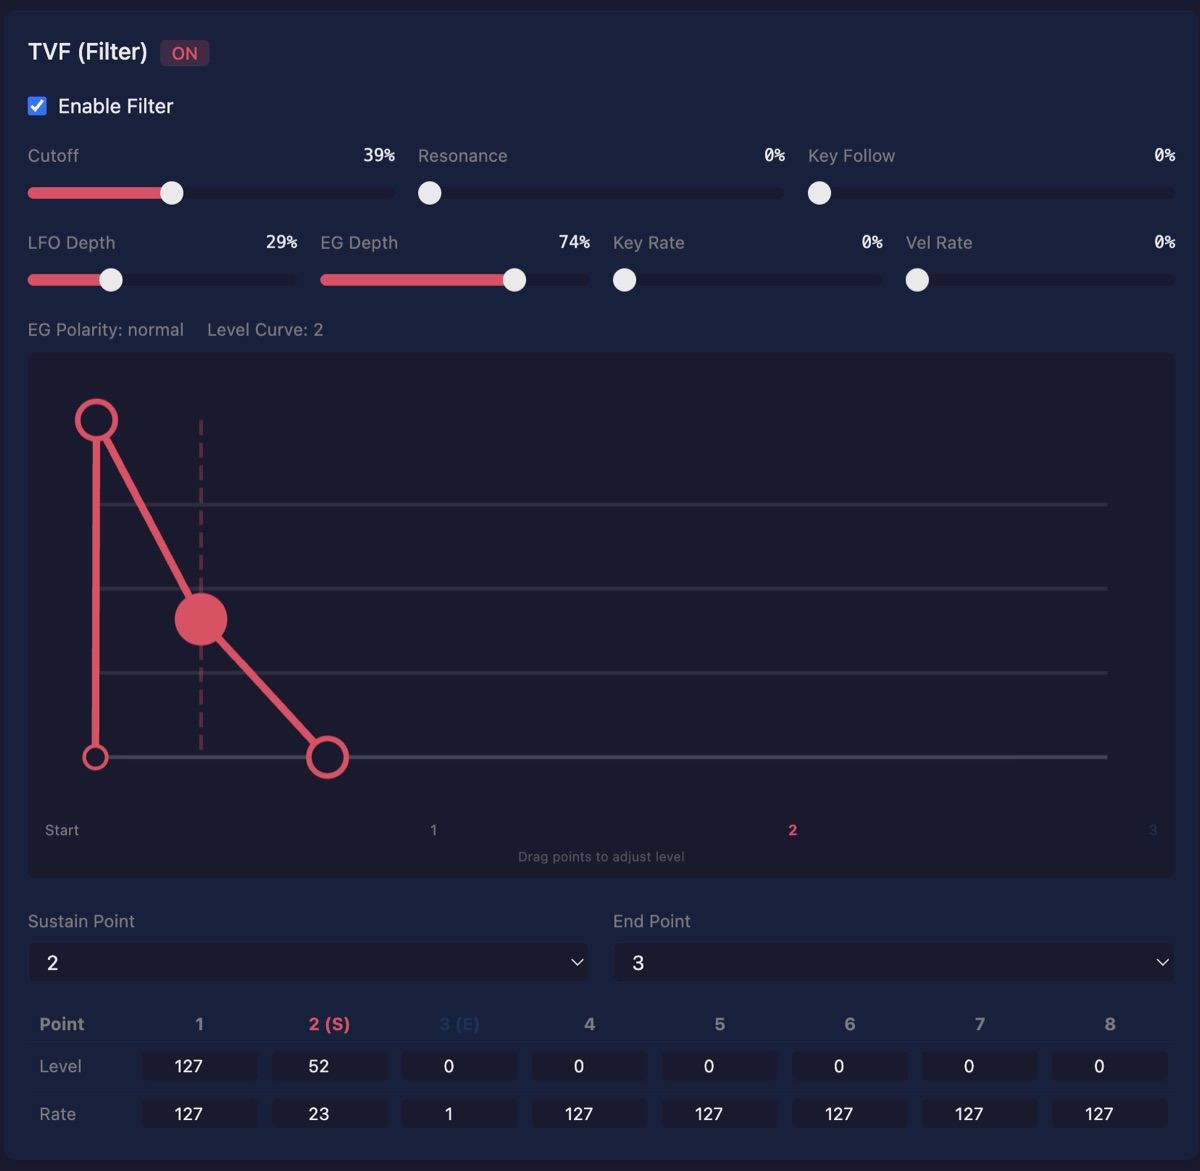
| Parameter | Description |
|---|---|
| Enable | Turn filter on/off |
| Cutoff | Filter cutoff frequency |
| Resonance | Filter resonance amount |
| Key Follow | How cutoff tracks keyboard position |
| LFO Depth | Amount of LFO modulation to filter |
| EG Depth | Amount of envelope modulation to filter |
| Key Rate | How envelope speed tracks keyboard |
| Vel Rate | How envelope speed tracks velocity |
| EG Polarity | Envelope direction (positive or inverted) |
| Level Curve | Response curve type |
TVF Envelope: An 8-stage envelope displayed as a draggable graph. Each point controls level; horizontal spacing represents time.
LFO
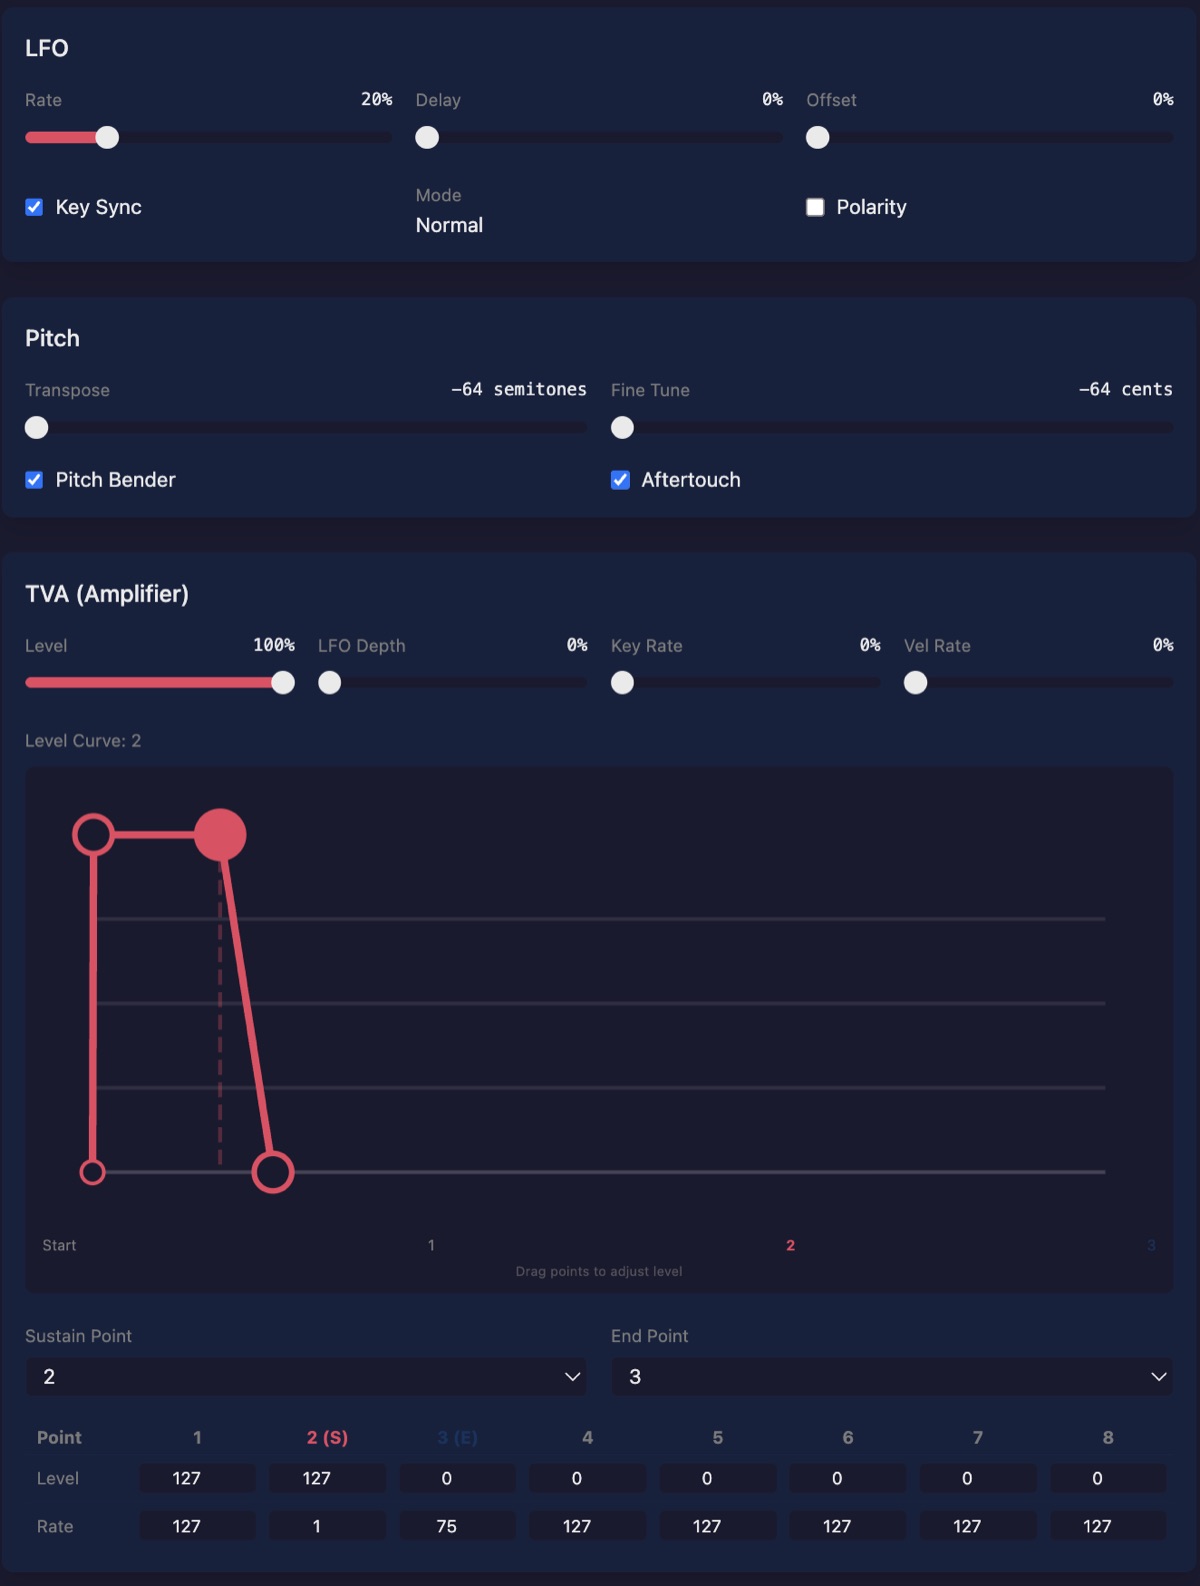
| Parameter | Description |
|---|---|
| Rate | LFO speed |
| Delay | Time before LFO starts |
| Offset | LFO center offset |
| Key Sync | Restart LFO on each note |
| Mode | Waveform type |
| Polarity | Unipolar or bipolar modulation |
Pitch
| Parameter | Description |
|---|---|
| Transpose | Pitch shift in semitones (-64 to +63) |
| Fine Tune | Fine pitch adjustment in cents |
| Pitch Bender | Enable/disable pitch bend for this tone |
| Aftertouch | Enable/disable aftertouch for this tone |
TVA (Amplifier)
Controls the volume envelope and level:
| Parameter | Description |
|---|---|
| Level | Base volume level |
| LFO Depth | Amount of LFO modulation to volume (tremolo) |
| Key Rate | How envelope speed tracks keyboard |
| Vel Rate | How envelope speed tracks velocity |
| Level Curve | Response curve type |
TVA Envelope: An 8-stage amplitude envelope displayed as a draggable graph.
Editing Envelopes
Both TVF and TVA feature 8-stage envelopes displayed as interactive graphs.
To edit an envelope:
- Click and drag any point to adjust its level (vertical) or time (horizontal)
- Changes update in real-time in the editor
- When you release the mouse, the value is sent to the S-330
The envelope stages are:
- Points 1–4: Attack/initial portion
- Points 5–7: Sustain/middle portion
- Point 8: Release
Real-Time Sync
The editor maintains bidirectional communication with the S-330:
Editor → S-330: When you change a parameter in the web interface, the new value is immediately sent to the sampler via SysEx. You’ll hear the change in real-time.
S-330 → Editor: When you change a parameter on the S-330’s front panel, the editor receives the update and reflects it in the interface.
Note: The S-330’s native display doesn’t always auto-refresh when values arrive via SysEx. If you’re viewing the native screen via video capture and change a value in the web editor, you may need to navigate away and back on the S-330 to see the updated value displayed. The change is applied immediately—you’ll hear the difference—but the display refresh is a quirk of the hardware.
Saving Your Work
The editor communicates with the S-330’s working memory. Changes take effect immediately but are not automatically saved to disk.
To save your work:
- Use the virtual front panel or the S-330’s physical controls
- Navigate to MODE → DISK → SAVE
- Select what to save (All, Patches, Tones, etc.)
- Press EXECUTE
Without saving to disk, your changes will be lost when the S-330 is powered off.
Troubleshooting
”No MIDI access”
Your browser doesn’t support Web MIDI, or you denied permission. Use Chrome, Edge, or Opera and allow MIDI access when prompted.
Can’t connect to S-330
- Verify MIDI cables are connected correctly (OUT to IN, IN to OUT)
- Check that the Device ID in the editor matches your S-330’s setting
- Ensure your MIDI interface is recognized by your computer
- Try refreshing the page
Parameters don’t change on the S-330
- Verify the connection status shows green
- Check that the correct MIDI output port is selected
- Ensure the S-330 is set to receive SysEx (check MIDI settings in the S-330’s System menu)
Video capture not working
- Grant camera permission when prompted
- Select the correct capture device from the dropdown
- Some capture devices may not be compatible with the browser’s Media API
Front panel buttons don’t work
- Verify MIDI connection is active
- Some S-330 screens (particularly the sampling/recording screen) may not respond to remote control via SysEx
- Try different navigation mode (01 vs 09)
Keyboard Shortcuts
When the video panel and controls are expanded:
| Key | Action |
|---|---|
| ↑ ↓ ← → | Navigation arrows |
+ or = | INC |
- or _ | DEC |
F1 | MODE |
F2 | MENU |
F3 | SUB MENU |
F4 | COM |
F5 | EXECUTE |
Enter | EXECUTE |
Build Info and Debugging
The editor includes built-in tools to help diagnose issues.
Build Info Button:
Click the commit hash button in the header (next to the MIDI status) to open a modal with:
- Info tab — Build time, git commit, branch, and commit date
- Logs tab — Captured console errors, warnings, and log messages
Reporting Issues:
When you encounter a problem:
- Open the build info modal
- Switch to the Logs tab to see any captured errors
- Click Copy for Issue to copy the environment info and logs to your clipboard
- Click Open Issue to go directly to GitHub with your environment pre-filled
This makes it easy to include all relevant debugging information in bug reports.
About
The S-330 Web Editor is an open-source project developed as part of the audiocontrol audio tools collection.
For bug reports and feature requests, please open an issue on GitHub.
See Also
- Roland S-330 Overview — specs, accessories, related devices, and the web editor
- The Roland S-Series Samplers — a guide to the full S-series lineup
- A Free Web Editor for the Roland S-330 — the original blog post about the editor
- What’s New in the S-330 Editor — February 2026 update
- Roland MU-1 Mouse Guide — history and alternatives for the original mouse
- Roland RC-100 Remote Controller Guide — the dedicated control surface